Feeds:
Posts
Comments

Posts Tagged ‘brooklyn’

It’s a funny thing to be, as they say, a carnivore, an omnivore, that unique creature that is as at home eating leaves and seeds and beans and roots as it is feasting off the murder of some creature that once roamed (albeit stupidly) across this great land of ours. The arguments for either side (Vegetarians/Vegans: Animals shouldn’t be hurt, they have feelings too. Carnivore/Omnivore: Screw it, if it bleeds, it’s on my plate) are compelling. But let’s be honest here. The front teeth, the large beaver-like buck teeth and the grinding and masticating molars are pretty much built for veggies. You wouldn’t be able to eat a carrot without them front chompers and you wouldn’t be able to get your nuts and seeds all ground up. It’s just what we’re made for. (now, those pointy teeth, that’s a whole ‘nother bucket of fries. It sure as hell ain’t for eviscerating a lettuce.)

For the longest time, I was of the opinion that dinner was MEAT>VEGGIE>DESSERT. A potato, a salad, a side of peas or spinach and you’re set. As long as you had the meat there. Well, kids, it just ain’t so.

Do you realize, you can eat vegetarian and not even know it?

Let’s say you make spaghetti. You whip open a box of pasta and a jar of spaghetti sauce. Boil pasta, heat sauce. Plop it on a plate and look at that. No meat touched that plate (that all changes once you throw your pound and a half of unverified ground beef into the pot, but I digress). That is just one example. There is an infinitude of awesome food that you can make that’s vegetarian, hearty and you’ll never even notice that you haven’t eaten a bite of meat.

Take for example tonight. Hannah and I had creamed mushrooms on toast and a half a bottle of a really nice wine. The only animal product came from the butter and the cream, and since we know exactly where those came from, we know the animals weren’t harmed in any way and they live happy lives. We can be proud of that.  Me?  I’m full and ready to pass out to some Doctor Who.  David Tennant will always be The Doctor for me.

But the best recipe we have for a meal that we constantly go back to, week after week, month after month is Chana Masala from Molly Wizenberg.  Absolutely fantastic.  You have onions, and tomatoes (and if you can get the San Marzano ones on sale, please do.  Lordawmighty. We also like Muir Glen Fire Roasted, diced tomatoes) and chickpeas and the only animal product that is in this meal is the post cooking addition of sour cream or yogurt if you are so inclined (which I am, thank you very much) – if you’re a vegan, or partial to abusing the acidic properties of ingredients (which Hannah is, thank you very much) a squeeze from a lemon wedge is just fine too (or so she says). Add a Brooklyn Lager to that meal and an awesome Astoria Pita, and you will eat until your guts burst and you pass out from pure and utter simplistic bliss.

We follow her recipe to a T, using about 5 shakes of cayenne pepper as the only deviation.  Sometimes that doesn’t even happen.  We’ve made it so many times that I think we skip a step every time.  It’s never the same way twice.

What I mean to say is, it’s in our regular rotation and, as a die hard meatosaur, as someone who will, when left to his own devices, eat three enormous hot dogs in rapid succession, that’s saying something.  Actually, I kind of want it now.

Damn these blogs.

Molly’s recipe follows, exactly as she has it on her blog.  I just copied and pasted it, with apologies to Molly.  (But for real, go check more of her recipes.  She’s never let us down.  Her book is good too!)

Chana Masala

When I’m not hovering next to him with a pen and paper, Brandon makes his chana masala by feel, tasting and tweaking, stirring and sniffing. The recipe that follows is our joint effort to make his rendition reproducible, and to make it user-friendly for those who love a good, prescriptive recipe, myself included. You should feel free, however, to taste and tweak as you see fit. It’s the Brandon Way.

This chana masala can be served in two different styles: with a half-cup of whole-milk yogurt to smooth and soften the flavors, or sans yogurt, served with a squeeze of lemon and a pinch of fresh cilantro. I prefer the former, but Brandon leans toward the latter. Either way, this dish is even better the second—or third—day.

Good-quality olive oil
1 medium onion, coarsely chopped
2 medium cloves garlic, minced
1 tsp cumin seeds
½ tsp ground coriander
¼ tsp ground ginger
1 tsp garam masala
3 cardamom pods, lightly crushed
1 28-ounce can whole peeled tomatoes
1 tsp kosher salt, or to taste
1 Tbs cilantro leaves, roughly torn, plus more for garnish
A pinch of cayenne, or to taste
2 15-ounce cans chickpeas, drained and rinsed
6-8 Tbs plain whole-milk yogurt, optional
A few lemon wedges, optional

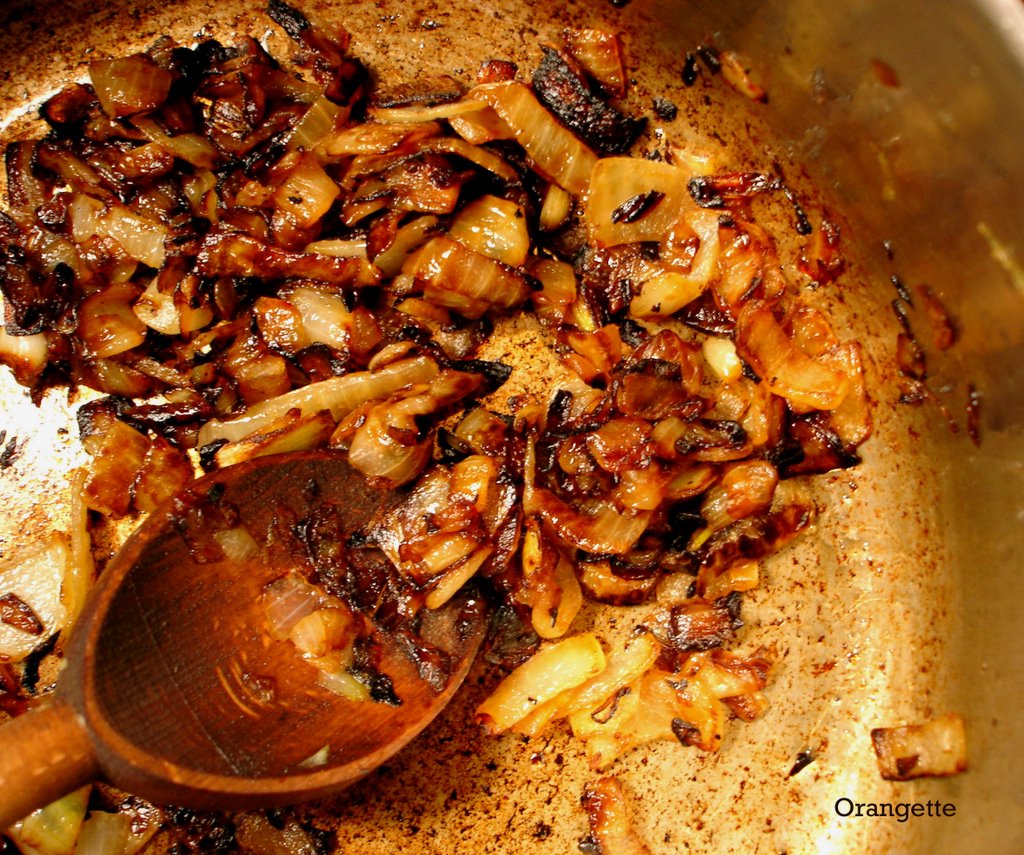
Film the bottom of a large saucepan or Dutch oven—preferably not nonstick—with olive oil, and place the pan over medium heat. Add the onion, and cook, stirring frequently, until it is deeply caramelized and even charred in some spots. Be patient. The more color, the more full-flavored the final dish will be.

Reduce the heat to low. Add the garlic, stirring, and add a bit more oil if the pan seems dry. Add the cumin seeds, coriander, ginger, garam masala, and cardamom pods, and fry them, stirring constantly, until fragrant and toasty, about 30 seconds. Add ¼ cup water, and stir to scrape up any brown bits from the bottom of the pan. Cook until the water has evaporated away completely. Pour in the juice from can of tomatoes, followed by the tomatoes themselves, using your hands to break them apart as you add them; alternatively, add them whole and crush them in the pot with a potato masher. Add the salt.

Raise the heat to medium, and bring the pot to a boil. Reduce the heat to low, add the cilantro and cayenne, and simmer the sauce gently, stirring occasionally, until it reduces a bit and begins to thicken. Taste, and adjust the seasoning as necessary. Add the chickpeas, stirring well, and cook over low heat for about five minutes. Add 2 Tbs water, and cook for another five minutes. Add another 2 Tbs water, and cook until the water is absorbed, a few minutes more. This process of adding and cooking off water helps to concentrate the sauce’s flavor and makes the chickpeas more tender and toothsome. Taste, and adjust the seasoning as necessary.

Stir in the yogurt, if you like, or garnish with lemon wedges and cilantro. Serve.

Yield: About four servings

Read Full Post »

This weekend is prime tomato season, so we’re putting up sauce for the winter!  We’re also making another batch of Bread And Butter pickles and lordy-lou the house already smells awesome from Hannah’s Buttermilk Bread.

* Oven-Roasted Tomato Sauce
* Bread and Butter Pickles
* Finishing touches on Limoncello
* Paella with Chicken and Fresh Littleneck Clams
* Spanikopita with Braising Greens and Fromage Blanc

Read Full Post »

This weekend, we’re testing out new recipes and have lots of good things to make. And so, here’s the list of awesome summer things that we’re going to be making in the next two days:

_IGP6210
* Pickles

* Cherry Preserves

_IGP6226
* Sour Cherry Syrup

_IGP6222
* Beignets

homemade tortillas
* Flour Tortillas

* Frozen Peas

homemade lemonade
* Lemonade

CSA corn fritters and greenmarket salad (close)
* Corn Fritters

english breakfast
* English Breakfast (bangers, eggs, toast, roasted tomato)

First up: Breakfast.

Read Full Post »

You sit and you sit and you wait around for water to boil and for the San Georgio pasta to finish cooking to a point where it’s no longer a moderately hard, possibly still slimy, wholly inedible mess, and you think to yourself, My God, there must be a better way.

You think that when you pour your pasta sauce on top; a thick mess, with the same flavor as last time, with the expected sweetness of King’s Table Syrup and the richness of a penny.  It has an odd greasiness, the source for which you just can’t place and it just sits there on top of your not quite fully cooked pasta and looks back at you.  You’re vaguely reminded of the Nietzsche quote about the abyss looking back at you.

The cheese, for so it is called on the plastic container, is pulverized; a dairy blizzard contained in the petrochemical container.  You shake it onto your pasta with sauce and winter comes to Pastaland.

And then, in a flash, you are transported.  The world is new, your kitchen is bright.  You have in front of you, a pile of flour and a carton of eggs.  You have the makings of a dough, and inexplicably, you begin to put it together:  flour, eggs, elbow grease.  The dough, a thick, plastic substance in a lump, looking at you, expectantly, like an ominous sort of nineteen fifties B-movie monster baby, that looks cute, but will kill you at a moment’s notice!

Relax, that’s not the case!  You don’t need the fire extinguisher, Steve McQueen.  Just let it sit for a bit.  You’ll see.

After it has melded and you’ve finished your drink (because that is important while cooking.  Be sure you’ve gotten some whiskey or some wine), you get up, fire up your pasta press and you run your pasta dough through it, a very zen action.  In.  Through.  Fold.  In.  Through.  Fold.  In.  Through.  Fold.  When it’s smooth enough, you turn it down, to a smaller setting, and smile devilishly, as you begin to consider your pasta as the Chief guard from the Temple of Doom.  He doesn’t have a chance!

_IGP6095

Thinner and thinner the pasta gets.  You have some problems here and there, but it gets easier and it gets smoother and it gets better and better and soon, you have an edible curtain of egg and flour.

_IGP6093

What to do with it though?

_IGP6109

You have fresh, local, organic zucchini and garlic scapes in the refrigerator and a jug of olive oil on the counter.  Some salted water, two minutes and a quick saute of the veggies later, you have an amazing new meal that will fill you up, help you sleep and give you some vegetables.  You shave a bit off the block of Parmesan that materialized on your table and as you take a bite, the crisp scapes snapping under your teeth and the zucchini, soft and a bit salty from the cheese, with a touch of oil to smooth it all out…

Homemade tagliatelle with zucchini and scapes

You wake up and look at your plate of industrially manufactured “pasta sauce.”  It was all a dream, there was no such experience.

But there could be.

Pasta
serves 2 generously

2 cups of flour
2 large eggs

Pour flour into large bowl (if you’re ambitious and have no fear of insane messes on your counter, pile it up on your counter).  Make a well in the center.  Add your eggs.  Use a fork to gradually incorporate eggs into flour.  When it becomes too thick, switch to a wooden spoon or your hands.

Form dough into a ball.  Wrap in plastic wrap, rest in fridge for 30 minutes.

Break dough into quarters to run through your pasta maker (note:  if you don’t have a pasta machine or want to be like the Italian mamas, slap that thing on the counter, and use a rolling pin.  That’s called doing it old school.) Be sure to have plenty of flour around, in the event that your dough is a little too sticky.  Thickness and width of noodles should be to your own preference.

Read Full Post »

Time was that a fella needed to eat on weekends when he was working a job in a television studio.  Glamorous as that sounds, being a cameraman for a six o’clock and eleven o’clock local news station three days a week with a retired English teacher as your only companion is not the world’s greatest job.  In fact, there is a seriously good chance that it’s the worst job ever.

Point is, a fella needs to eat between seven o’clock and the eight-thirty bumpers.  In Lancaster, PA, you have a few options.  You can go to the grocery store and buy an apple, some cider, a roll of questionable quality, and a hunk of cheddar.  You can bring something sketchy from home that had a good to GREAT chance of being spat in by roommates, or you can go fast food.

Sadly, fast food was the only option within walking distance that was cheap enough to let me afford rent.  Was it burgers?  Was it subs?  Was it chicken?  No.  No, it was Taco Bell.

I would go and order a supreme gordita meal and an apple cinnamon empanada, sit at a table by myself, and read a comic, or a book, or something sad and pathetic, all the while wishing my career path would take a drastic turn.

1 grind it up

Fact of the matter was, the best part of that moment, that time in the Taco Bell, sadly, was the taco sauce, those little mylar packets that you open with your teeth and squirt all over your pseudo-Mexican food.  It comes in Mild (sissy), Medium (perfect for me) and Hot (Hannah).  It had some tang and some heat and was just generally something that made the “food” palatable.  I always wondered how someone would make it.

Five years later, and uncountable packets of taco sauce consumed, I gave it a shot.

2 boil it up

I looked up how to make taco sauce on the internet and there were a whole bunch of things on how to make Taco Bell’s Taco Sauce, but I wasn’t convinced that I really should be making something with Garlic Salt, Onion Powder or The Blood Of Immigrant Children, so I decided with those general ideas and an immersion blender, I would concoct my own.

Feel free to make adjustments and create your own version.  I would recommend even adding a couple splashes of apple cider vinegar at the end for a touch of tang.

5 hot sauce suppertime

Matthias’ Taco Sauce

(yield: 12-15 oz)

  • 1 15oz can diced organic tomatoes (I like Muir Glen)
  • 1 medium onion diced (or half a large one)
  • 2 cloves of garlic, minced
  • 1 tsp freshly ground coriander
  • 1 tsp cumin seeds, ground
  • 1 Tbsp chili powder
  • 1/2 tsp cayenne (or more if you like it hot)
  • Sprinkle of dried oregano
  • Salt to taste
  • Canola Oil

Dice up your onions and throw them in a saucepan with a glug or two of canola oil and a pinch of salt.  Cook over medium heat for about 15 -20 minutes, until they are soft and starting to brown a little.  In a mortar and pestle, finely grind the cumin and coriander. Toss in your garlic and let that cook for a couple minutes (remember, you don’t want that to brown; it’ll get bitter).  Add a couple dashes of oregano and stir it into the garlic/onion mixture, along with your cumin and coriander.

When you’re satisfied that this is all set, pour in your tomatoes.  Add the chili powder and cayenne.  Stir.  It’s going to dry up a little, but that’s ok.  Turn the heat to medium low and let it simmer uncovered for another 10-15 minutes.  When the flavors have all combined, take an immersion blender (or just ladle it into a regular blender, be sure to leave a small gap between the vessel and the the lid, lest you should risk explosion) and zizz it all up until you have a smooth, deep crimson paste.

It will last a little while.  Don’t worry if you don’t use it all at once.

Read Full Post »

In the broken heart of New Orleans, there stands a public house that goes by the name, The Pirate Alley Cafe.  There are sandwiches and drinks and colorful characters that exist, just off the beaten path, two blocks from Bourbon Street and directly next to the landmark Presbyterian Church.  It was here, several years ago, that I was first introduced to Absinthe, or rather a pastiche of the elixir, known colloquially as “Absente.”

A poster, a parody of a 19th Century painting advertising the absinthe-like drink, caught my eye, and I, along with my companions stopped in for a drink of the mythical muse of the artists.  My love affair with the green fairy began with a bang and a whiz and the assumption that I was hallucinating, when in fact there were no hallucinogens in the faux-absinthe.  There are no hallucinogens in real absinthe.  But that’s a tale for another time.

I’ve tried several kinds of Absinthe in my day.  Absente.  La Fée.  And a brand that hadn’t been branded yet.  It was an absinthe that a friend of a friend, a distiller, was making at behest of his boss.  It was a powerful beverage.  It was terribly herby and had so many essential oils in it that it made our paper cups that we so classily were drinking from by the time I had finished one serving, I was actually speaking to myself on 23rd Street all the way back to my apartment in Astoria.  This is actually a good thing: if you’re talking to yourself, people tend to leave you alone on the train.  It also works if you smell bad.

This absinthe has since been refined. It is called St. George Absinthe.

Sazerac Ingredients

Hannah and I bought a bottle of it, at great expense, though it is taking us a very long time to get through it.  Why would this be?  So we don’t have to buy another bottle of it?  Because we aren’t big drinkers?  Because it’s not great?

Absinthe

Nope.  Well, maybe so we don’t have to buy another bottle.  But mostly, it’s because of the Sazerac.

The Sazerac is a terribly romantic drink, named for a cafe in New Orleans in the 1850s.  You have one sip and can imagine Poe in his Baltimore haunts drinking until his brain thought up the “Cask of the Amontillado” or “The Gold-Bug”.  It has the sort of properties that will let you sit down on a Sunday afternoon, have one (or two, if you’re feeling particularly like you’d like to be numb.  It is pretty potent), and do the New York Times Crossword.  This may, as we later discovered, be the precise reason why we could not complete it this week.  Perhaps that is neither here nor there.

The Green Fairy is but an element to this very strong drink and it’s barely there.  If you want to drink Absinthe of it’s own merits, by all means, but this is neither the time nor the place for it.  This is the place to talk about the herb undertones swirling through the bittersweet whiskey; to talk about how that first swallow burns, even though you’ve given it a few good sniffs before imbibing; to talk about how the licorice mixes ever so subtly with the lemon essence, which mixes ever so gently with the bitters and the sugar and the whiskey.  It is the place to talk about a complex drink that is terribly simple to make and even easier to drink.  It is the place to tell you how to make it:

Final Sazerac

The Saint George Sazerac

Yield: 1 glass

•    1 sugar cube
•    6-7 dashes of Angostura Bitters
•    1 tbsp water
•    2 shots, St. George Whiskey
•    splash St. George Absinthe
•    Lemon peel for garnish
•    Equipment:  A muddler (the end of a wooden spoon will suffice) and an extra glass.

Place your spare glass into the freezer to start on a good chill.  While that glass is chilling, you can start on the drink.

In your unfrozen glass, place your sugar cube, bitters and water.  Bash that all up with the end of your wooden spoon until the sugar has either dissolved completely, or mostly dissolved.  Pour in the whiskey.  Stir to blend.

Once your other glass has gotten a nice layer of frost on it, pull it from the freezer.  Pour the splash of Absinthe into the bottom and swirl, coating the sides of the glass.  I would now say pitch the remaining absinthe, but that seems terribly wasteful so I’m going to tell you to find a Hannah and give it to her.  It’s not even a shot, so it’s no big deal.  Pour in your Sazerac from the other glass.  Spritz with the lemon peel and garnish.

Be merry.

Read Full Post »

When we lived in Astoria there was a bakery called Saint Honoré, named for the patron saint of bakers, nestled inauspiciously right before the butcher shop on Ditmars Avenue, and frequented by customers who do not take sainthood lightly. It was a bare bones sort of place, not packed with rickety tables and chairs with uneven legs, but rather just two counters and a refrigerator with a glass door, partially blocking the kitchen from the cashier. There were no labels on the rows upon rows of tidy buttery cookies, patisserie, and impeccably towered cakes. And the proprietor and his sole staff member seemed to miraculously predict what it was that you would be inclined to order.

We used to walk often up and down the tree-lined streets of our beloved neighborhood, past the brick duplexes and their yards filled with statuary or small gardens with septagenarians shouting in Greek and smoking cigars, to the hill of Astoria Park sprawling generously to the East River looking across its grime from under the Triborough Bridge onto the endless ascent of Manhattan. Often these strolls would lead us back up Ditmars Avenue and on our way home the call of the creamy éclair (for me) or chocolate cigars (for Matthias) from Saint Honoré could not be muffled. And so, we indulged. Guiltlessly and with complete abandon, nothing could detract from the pleasure of their soft pastries filled with vanilla cream, at once so light and yet so very rich intermingled with the velvety chocolate smear those éclair seemed to wear like a beautiful scarf, effortless, and elemental.

squeezing out

We now live through days where strolls are not an option for safety reasons, no local business is remotely enticing, and our food arrives to our stomachs as a cumbersome burden lugged from Manhattan via an interminable stint on the L train. We yearn for those idyllic days in Astoria and the tastes, smells, and sights that made them so precious, but we are also armed with the tenacity to persevere and bring glimmers of joy to our Brooklyn home. And so, I learned to make pâte à choux, pastry cream, and chocolate sauce. These three became cream puffs, and we became happy once more.

open puff

They were all that we had hoped for. The pastry was neatly structured on its exterior, its small golden brown spirals rising to encase the hollow, webbed, eggy interiors soon to be injected with luscious, cool vanilla pastry cream. These cream-filled parcels were then adorned with a simple chocolate sauce drizzle, left to harden ever so slightly, and greet each bite in turn with lightness, richness, and depth. Or, as I like to think, they arrived at our lips as a little treasure from our cherished Saint. Honoré.

final puff 2

Cream Puffs with Vanilla Pastry Cream and Chocolate Sauce

Yield: 16 cream puffs

Adapted from Gourmet, March 2008, and Bon Appétit, February 1998

We recommend that you make the pastry cream first and get it in the refrigerator to chill while you are working on the pastry, this will seem to decrease the amount of time you have to wait to grace your lips with the finished product.

When the pâte à choux has cooled, inject the puffs with the cream using a pastry bag or a plastic bag fitted with a piping tip in its corner. Alternatively, you could use a serrated knife to slice open the puffs (keep the top and bottom still attached) and spoon in approximately 1 1/2 tablespoons of pastry cream into each puff, replacing its ‘cap’ when it is full.

When the puffs are now cream puffs, begin the chocolate sauce. Drizzle with a teaspoon over each and let stand at room temperature for 15 minutes.

For pastry cream:

  • 1 1/2 cups half and half
  • 1/2 cup sugar
  • 2 large eggs
  • 1 large egg yolk
  • 2 tablespoons all purpose flour
  • 2 teaspoons vanilla extract

Bring half and half (we used 3/4 cup milk and 3/4 cup heavy cream) to a simmer in heavy medium saucepan.

Whisk sugar, eggs, egg yolk and flour in medium bowl to blend.

Gradually whisk hot half and half into the medium bowl, in a steady stream constantly whisking so as not to scramble the eggs. Transfer back to the saucepan and whisk over medium heat until mixture thickens and comes to boil, about 5 minutes.

Boil 1 minute. Pour into a clean medium bowl. Stir in vanilla. Press plastic wrap or parchment paper onto the surface of pastry cream so that it will not form a film when chilled.

Cover; chill until cold, about 4 hours. (Can be made 1 day ahead. Keep chilled. Makes 2 cups)

For pâte à choux:

  • 6 tablespoons unsalted butter, cut into pieces
  • 3/4 cup water
  • 1/4 teaspoon salt
  • 3/4 cup all-purpose flour
  • 3 large eggs

Preheat oven to 425°F with rack in middle. Butter a large baking sheet.

Bring butter, water, and salt to a boil in a small heavy saucepan, stirring until butter is melted. Reduce heat to medium, then add flour all at once and cook, beating with a wooden spoon, until mixture pulls away from side of pan and forms a ball, about 30-60 seconds. Transfer mixture to a bowl and cool slightly, 2 to 3 minutes.

Add eggs 1 at a time, beating well with an electric mixer after each addition.

Transfer warm mixture to pastry bag (or a plastic bag fitted with a piping tip in the corner) and pipe 16-18 mounds (about 1 1/4 inches wide and 1 inch high) 1 inch apart on baking sheet.

Bake until puffed and golden brown, 20 to 25 minutes total. Prick each profiterole once with a skewer, then return to oven to dry, propping oven door slightly ajar, 3 minutes. Cool on sheet on a rack.

For chocolate sauce:

  • 4 ounces semi-sweet chocolate (preferably organic fair trade)
  • 2 tablespoons softened butter
  • 1-2 teaspoons heavy cream

Melt chocolate, butter, and cream in a small saucepan stirring until liquid and combined. You may use a double boiler, but it comes together so quickly that I confess not to have bothered with the extra dishes.


Read Full Post »